In this article we will see
how to install Zabbix in Ubuntu 20.04 LTS Focal Fossa step by step,
both Zabbix Server and Zabbix Frontend and Zabbix Agent,
so you can monitor your Ubuntu server or VPS and all the remote machines you
need.
Before installing Zabbix 5 on Ubuntu 20.04 LTS
In order to follow the steps in this
Zabbix installation guide on Ubuntu 20.04 LTS, you must meet these
minimum requirements:
- One or more updated Ubuntu 20.04 LTS Focal Fossa machines
- The environment or LAMP stack (web service with PHP and database service) on the machine that will act as the Zabbix server
- A user with sudo permissions
- Internet access
How to install Zabbix 5 repository in Ubuntu 20.04 LTS
To work with the latest stable version of this software, we will install the
official Zabbix repository for Ubuntu 20.04 LTS, so we will download the
package that configures said repository.
We will install the Zabbix 5 repository on all Ubuntu 20.04 LTS machines,
both where it will act as a Zabbix server and on remote machines
~$ wget -q https://repo.zabbix.com/zabbix/5.0/ubuntu/pool/main/z/zabbix-release/zabbix-release_5.0-1+focal_all.deb
And we install it with the dpkg tool :
~$ sudo dpkg -i zabbix-release_5.0-1+focal_all.deb
We updated the information in the repositories to include the new Zabbix
packages:
~$ sudo apt update
How to install Zabbix Server 5 on Ubuntu 20.04 LTS
To install Zabbix Server in Ubuntu 20.04 LTS we will select the Zabbix
Server packages for the database engine that interests us, Zabbix Frontend,
the configuration of the web server with which we work and the Zabbix agent.
For example, for a LAMP environment with Apache, PHP, and MySQL this would
be the proper selection of packages:
~$ sudo apt install -y zabbix-server-mysql zabbix-frontend-php zabbix-apache-conf zabbix-agent
We also have the zabbix-server-pgsql package for PostgreSQL and
zabbix-nginx-conf for Nginx.
Database
In the case of working with MariaDB/MySQL we connect with the mysql console
client and an administrator user to prepare the database:
~$ mysql -u root -p
We create the database according to the character set required by Zabbix 5:
> create database zabbix charset utf8 collate utf8_bin;
In MariaDB or MySQL 5 we create the user like this:
> create user zabbix@localhost identified by 'XXXXXXXX';
While in MySQL 8 we would create it also indicating the compatible
authentication plugin:
> create user zabbix@localhost identified with mysql_native_password by 'XXXXXXXX';
We give the necessary permissions to the user on the basis:
> grant all privileges on zabbix.* to zabbix@localhost;
And we leave the client:
> exit
Now we will have to initialize the new database from an SQL script provided
by the Zabbix package, using the username and password that we just created:
~$ zcat /usr/share/doc/zabbix-server-mysql/create.sql.gz | mysql -u zabbix -p zabbix
Zabbix Server Configuration
After the Zabbix Server installation, a new service has been created in
Ubuntu 20.04 LTS, the zabbix-server.service or zabbix-server service, which
is not running or enabled for automatic start with the system.
This is because we have to configure Zabbix Server to use the password to
access the database:
~$ sudo nano /etc/zabbix/zabbix_server.conf
We look for the DBPassword directive:
...### Option: DBPassword# Database password.# Comment this line if no password is used.## Mandatory: no# Default:# DBPassword=...
The section appears, but not the directive, which we will manually add with
the value of the password of the database user, as we created previously:
...# DBPassword=DBPassword=XXXXXXXX...
Now we can start the zabbix-server service:
~$ sudo systemctl start zabbix-server
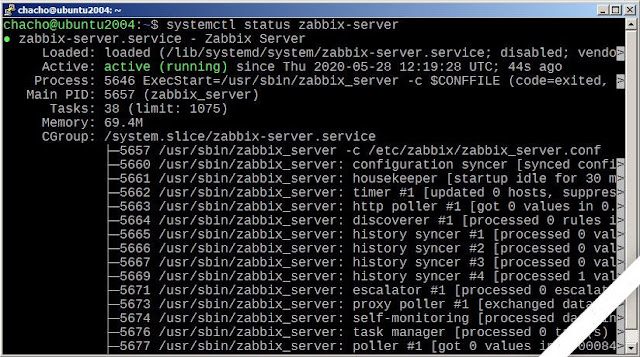
We can check that the service is working with the command
systemctl status zabbix-server
If we want the Zabbix Server service to start automatically with every start
of Ubuntu 20.04 LTS, we will have to enable it also with systemctl:
~$ sudo systemctl enable zabbix-server
Zabbix Agent service
Another service that was created during the installation is zabbix-agent,
corresponding to the Zabbix agent that will monitor the local system and
that, unlike Zabbix Server, does remain running, as we can see with the
command
systemctl status zabbix-agent
In order for the Zabbix agent to start automatically with Ubuntu 20.04, the
service must be enabled:
~$ sudo systemctl enable zabbix-agent
Web service
During the installation Zabbix Frontend configuration files have been added
for the web server, so we will have to reload the configuration of this
service to apply the new settings:
~$ sudo systemctl reload apache2
Zabbix Frontend installation on Ubuntu 20.04 LTS
We access the Zabbix Frontend web installer on Ubuntu 20.04 LTS from a
browser by adding the /zabbix path to the IP address or DNS name of the
server.
For example, the Ubuntu 20.04 LTS server on which we installed Zabbix 5 in
this tutorial is accessible in the ubuntu2004.local.lan subdomain, so we
will use http://ubuntu2004.local.lan/zabbix as the access URL:
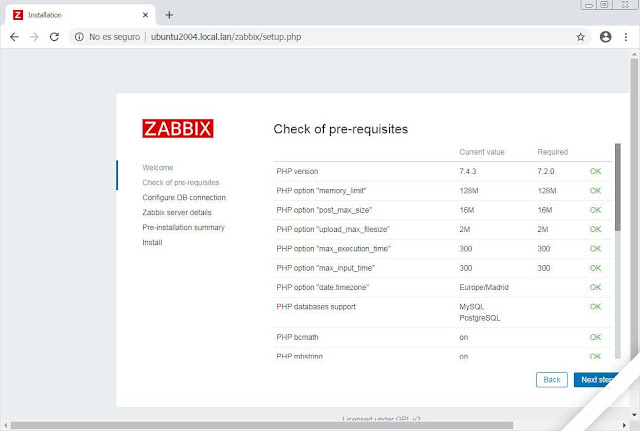
After the initial welcome page we will go to the system requirements check
page:
If you have followed the previous steps, all the requirements will be met
and you can continue with the installation process.
It is time to configure the connection to the database:
We select the type of databases in the drop-down, and enter the name of the
database, the user and their password.
The next step is to configure the connection to the Zabbix server:
Normally we will leave the default values, unless we have specified
different ones in the Zabbix Server configuration.
Once you have finished configuring the installation, a small summary will be
shown with the values to be used:
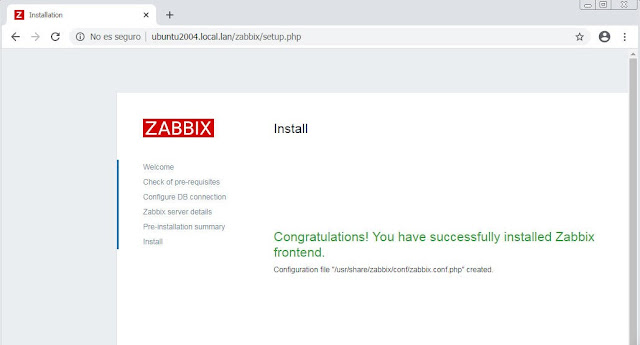
The installation finishes and we are informed of the location of the
configuration file that has been created:
Upon completion of the Zabbix Frontend installation process, the login page
is displayed:
The default administrator user is Admin, and his password is
zabbix .
After logging in, the application opens the main page,
«Monitoring/Dashboard«, where we can see a summary of the status of
the service, as well as the only monitored machine (the local machine):
If we want to see more information about the state of the local machine, we
will visit the " Monitoring/Hosts " section and open a context menu by
clicking on "Zabbix Server" in the list of monitored systems:
Among the various options available, we select «Graphs» and a page
will be shown with the activity graphs of all the monitored services of the
local machine:
How to install Zabbix Agent on Ubuntu 20.04 LTS
It is time to install the Zabbix agent (or Zabbix Agent) on Ubuntu 20.04 LTS
remote machines, where we have previously configured the Zabbix 5
repository:
~$ sudo apt install -y zabbix-agent
A new zabbix-agent.service service, or simply zabbix-agent, will be created
and left running and enabled.
Configure Zabbix Agent in Ubuntu 20.04 LTS
To configure Zabbix Agent in Ubuntu 20.04 LTS we edit its
configuration file:
~$ sudo nano /etc/zabbix/zabbix_agentd.conf
We look for the Server directive :
...Server=127.0.0.1...
It is configured with the value of the local machine (that is why the Zabbix
agent works without configuration on the Zabbix server). We must change its
value with the IP address, DNS name or domain of the Ubuntu 20.04 LTS
machine where Zabbix Server runs:
...Server=ubuntu2004.local.lan...
We save the changes, close the file and restart the zabbix-agent service to
load the new configuration:
~$ sudo systemctl restart zabbix-agent
How to configure the firewall in Ubuntu 20.04 for Zabbix
In case you have activated the UFW firewall in Ubuntu 20.04 LTS it will be
necessary to add a rule to allow incoming connections from the Zabbix
server:
~$ sudo ufw allow zabbix-agent
The change takes effect immediately.
How to add a remote Ubuntu 20.04 LTS machine in Zabbix 5
Back to the Zabbix server, through the Zabbix Server, we are going to add
the remote machine or machines in which we have installed and configured the
Zabbix agent.
How to configure remote machine Ubuntu 20.04 LTS
To configure a new remote Ubuntu 20.04 LTS machine in Zabbix Server we will
visit the " Configuration/Hosts " section of the side panel:
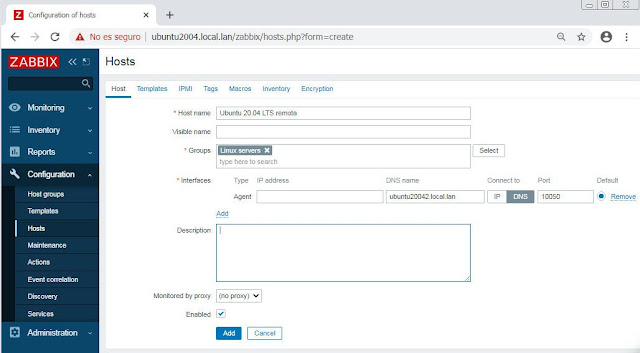
At the top right of the page we will find the button " Create host " that
will open the form to configure a remote machine:
This section of the form is easy to configure:
- In «Host name» we introduce the name of the machine.
- If we want to add a friendlier name, we will do so in «Visible name«.
- We will add the machine to one or more predefined groups using the «Select« button ; it is interesting to choose a suitable group ("Linux servers" in this example).
- In «Interfaces» we will specify the IP address and/or DNS name and we will select which of the two addresses to use to connect.
- Finally we can add a description, select the proxy (if any) and enable or disable monitoring.
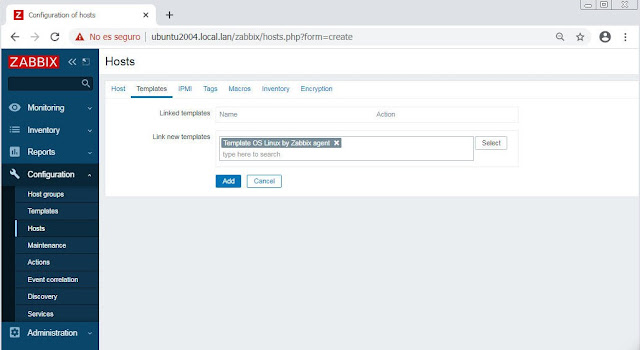
Instead of adding the new machine with the «Add« button, we will go to the
«Templates» tab of the form:
We will add templates using the «Select« button, which will open a small
window where we will have to choose, by means of another «Select » button, a
group of templates, from which in this case we could select
«Templates/Operating systems«:
Once the group is chosen, the list of templates it contains is opened, where
we can choose the ones we need, in this case, " Template OS Linux by Zabbix
agent " will suffice.
Now we can add the new machine with the «Add« button.
We will return to the «Configuration/Hosts« section, where we can see the
new remote machine in the list at the bottom of the page:
We will visit «Monitoring/Hosts«, where the remote machine will also be
shown in the list, and in the contextual menu displayed when clicking on its
name we will choose «Graphs«, so that we will access the graphics page of
this machine. We will see that the reception of data has begun:
As simple as that!
conclusion
Now that you know how to install Zabbix 5 in Ubuntu 20.04 LTS Focal Fossa it
is easy to start monitoring the status of the machines on your local
network, or servers and VPS on the Internet.
If you have doubts or questions, suggestions, notifications of possible
errors, etc. You can leave a comment that we will review as soon as
possible.












![[GUIDE] Ubuntu: how to free port 53 used by systemd-resolved](https://blogger.googleusercontent.com/img/b/R29vZ2xl/AVvXsEhTnOVoFyPFdIH_O58bx2dvTOjds0TlkTktMpMg3tW7GKuhiqyPivAPPjChpHvd-2TKm8yfhrpX_VGnBjV_e5h7HYEB9Ic07hkLGIRPF-mbsh7iFMICQwmNWAxq11PYPWz16aHUjhPCPacG/w100/ubuntu-19-04-eol.jpg)

0 Comments