Hyper-V is a hypervisor-based virtualization application that allows executing any Linux distribution in Windows 10 on machines with an Intel or AMD processor with virtualization technology enabled. In addition to the server versions, Hyper-V is available in the 64-bit client versions of Windows 10, Professional, Enterprise and Education.
A couple of months ago, Canonical created an optimized Ubuntu image for the hypervisor of Microsoft ("Hyper-V Quick Create"), with advantages such as better integration of the clipboard, dynamic scaling of the desktop, shared folders between host and guest and better experience with the mouse when changing from one to another. And all thanks to the new implementation of XRDP preconfigured to run by default right after completing the installation of the system.
Ubuntu Linux in a Hyper-V session in four steps
Of course, there are other ways to install Linux on Windows computers, such as installing both (together, but not scrambled) with dual boot, but the use of virtualization technologies facilitates the task and more if done from a system tool and with The new image optimized for use. If you want to try it, we remind you how to do it in four steps.
1.- Active Hyper-V . The hypervisor is not installed by default in Windows 10, but it is easy to obtain in either of these two ways:
- Access the PowerShell console as an administrator and run the Enable-WindowsOptionalFeature -Online -FeatureName command: Microsoft-Hyper-V -All
- If you do not use Windows consoles, you can also do it in graphic mode. Access the control panel> Programs and features. Click on "Activate or deactivate Windows features". Search and mark Hyper-V to install it.
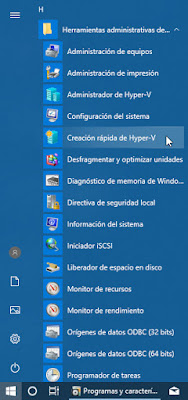
2.- Run Hyper-V Quick Creation . It is an application added by Microsoft in Windows 10 (Fall Creators or higher), which allows you to add a virtual machine in a few minutes. Execute it from the start menu:
3.- Installation of Ubuntu . The ease of this type of applications is maximum and is within the reach of a simple click. You have two ways to get Ubuntu from the same interface:
- By default, the same application will download the Ubuntu 18.04.1 LTS image to the computer.
- If you have already downloaded an image of Ubuntu 18.04.1 LTS (64-bit desktop client version) you can select the .ISO file on your local machine.
4.- Configuration. The management of this installation is similar to what we would do in a virtual machine, editing the hardware we will use and the management features. We can do it in two ways:
- We manually edit each component (processor, memory, disk space ...) that we will assign to the machine:
We opted for the automatic mode to connect the machine and configure it later:
In a medium level team with SSD we completed the whole process in just 4 minutes, including the download of the Ubuntu image, the creation of the virtual machine and the installation of the system.
This type of solutions is especially for professional areas, especially development, but any user can use it to have Ubuntu in Windows 10.
Photos: https://www.muycomputer.com


0 Comments