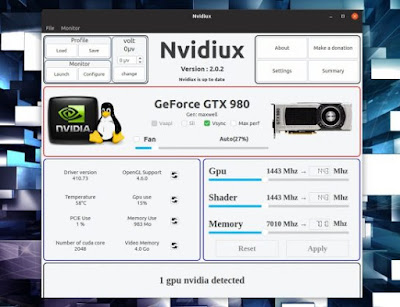
To be able to overclocking Nvidia graphics cards on the GNU/Linux OS you need Nvidiux. The tool allows you to overclock (or downlocklock) your card, as well as additional functions and features such as monitoring your card parameters, fan control, etc.
As you know, Coolbits option is very necessary to enable overclocking of Nvidia GPUs on Linux, so Nvidiux automatically creates the xorg.conf file with the Coolbits option, and can perform loading overclocking, support saving, and automatic overclocking at start up or underclocking profiles and more. All this makes it easier for you and gives you a unique experience that will satisfy you. In addition, Nvidiux is easier to use compared to other tools that perform the same function in overclocking as Afterburner, MSI.
Here I will list some of the other Nvidiux functions:
- gpuBoost V1 (requires Nvidia GT (X) 6xx)
- It is possible to change the fan speed
- Show various parameters of your board (driver version, OpenGL version, temperature, GPU usage, available memory, etc)
- It is possible to modify GPU clock, shader and memory transfer rate frequency
- It is able to enable (or disable) the Vsync
- Overvolting (while undervolting is not supported, to date)
- Saving pre-set profiles for overclocking and underclocking
- Real-time monitoring of temperatures, fan urges, CPU load and memory usage
You need to use Nvidia proprietary drivers (version 337 or higher for overclocking, 346 or higher for overvolting). and Nvidiux works with 4XX or higher cards.
In the picture you see the GPU monitoring tool
To get the GPU monitoring tool as above you will need to install pyqtgraph (in Debian, Ubuntu, Linux Mint, etc. date: sudo apt install python-pyqtgraph) and then go to Nvidiux settings and enable the Activate experimental monitor .
Before proceeding with this guide, I caution that overclock the video card may damage the card if you do not know what to do.
There is a DEB file provided by the GitHub page that can be installed on many Debian/Ubuntu based distributions, and is compatible with:
- Ubuntu 12.04+ and derivatives
- Fedora 15+
- Arch and Manjaro
- Debian 7.0+
User guide Nvidiux
Normally you do not have xorg.conf in /etc/X11/ but if you find it you have to rename the xorg.conf file to any other name such as xorg.conf.exp1, before running Nvidiux
- sudo mv /etc/X11/xorg.conf /etc/X11/xorg.conf.bck1
Although Nvidiux should automatically create xorg.conf file by automatically adding the Coolbits option, this does not always work. If the xorg.conf file is not available, the application will prompt you to create it and then restart the system.
Guide to how to Overclocking or underclocking profile at startup
At startup, if the over / underclock profile is not automatically set, then Nvidiux must be added to the applications that run when the system starts.
First, search the forums to find the values compatible with your video card, then from the easy-to-use GUI you will create an overclocking profile and specify your preferences, then go to Profile -> Save.
From the application menu you will now add the application to startup by clicking on Add, and then name it (for example Nvidia Overclocking), now do the following command:
- sh -c 'nvidiux --silent "/path/to/overclockingprofile.ndi"'
The next step will be to replace the /path/to/overclockingprofile.ndi with the path of the profile that you created in the previous step, For example: "/home/.../GeForce GTX 980-1450 Mhz.ndi"
If this method is not successful you can create a cron job and get the same result, To do this, give the following command:
- crontab -e
- @reboot sleep 60 && env DISPLAY=:0 /usr/bin/nvidiux --silent "/path/to/overclockingprofile.ndi"
DISPLAY=:0 it may not work on every system. Open the terminal and give echo $DISPLAY and place in the command above what is shown to you by the terminal instead of :0, in case it returns a different value. You must then replace it "/path/to/overclockingprofile.ndi" with the path of the profile you generated earlier.


![[GUIDE] Ubuntu: how to free port 53 used by systemd-resolved](https://blogger.googleusercontent.com/img/b/R29vZ2xl/AVvXsEhTnOVoFyPFdIH_O58bx2dvTOjds0TlkTktMpMg3tW7GKuhiqyPivAPPjChpHvd-2TKm8yfhrpX_VGnBjV_e5h7HYEB9Ic07hkLGIRPF-mbsh7iFMICQwmNWAxq11PYPWz16aHUjhPCPacG/w100/ubuntu-19-04-eol.jpg)

0 Comments